So far we have tested our first PHP Program on our local server. Now, we will move to Database configuration. Every dynamic website including Content Management System needs to store some data in storage space from where the application can read it when needed. MySql is by far the most used database for dynamic web sites and it is open source license, lightweight, high performance and simple to use. CMS like Wordpress, Joomla, Drupal etc. rely on MySql to store and retrieve data. Let's configure our MySql Server first.
Click Green colored WampServer icon in windows notification area. If this icon is not available start your WampServer by double clicking the WampManager icon from Desktop or from left pane of startup menu. Let it be green, click it. From the popup menu click phpMyAdmin.
On clicking phpMyAdmin the mySql client application starts in a new browser. You can start phpMyAdmin by typing following address in your browser's address bar.
http://localhost/phpmyadmin or http://127.0.0.1/phpmyadmin. By default Mysql Username is root and without password.
Type username root, and select MySQL in Server Choice drop-down list and click Go button. When you are in you can see an interface like this.
The left side of the phpMyAdmin client interface shows existing databases os Schemas you have in your MySQL Server. Each database or schema contains one or more tables. A table has one or more columns which is also called as fields. Finally, tables contains data as rows. Les's create our first database.
In phpMyAdmin click Database, type the name as myFirstDatabase, click Create Button.
Your database created and now you are inside your myFirstDatabase database. If you are outside your database, click the name of the database you have created from the left side of the phpMyAdmin, and you are in.
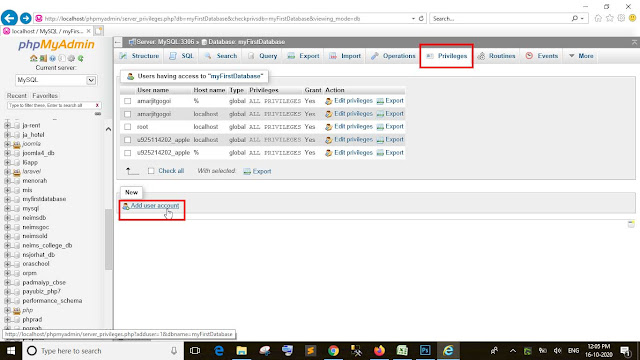
Now we will create new account with username "solocoding" and password "mypassword" and will set up the privileges to work on the database myFirstDatabase. Click Privileges then Add user account.
Here is the confirmation.
Now let's try to log in to MySQL Server using out new username and password. Close the above phpMyAdmin Client Interface and open your browser and type http://localhost/phpmyadmin, type the username and password you have created for database myFirstDatabase.
Now let's create a table for database myFirstDatabase. To create table first select the database we have created. Now type the name of the table as userlogin, type 5 in place of 4 in Number of columns and click Go button.
Now the phpMyAdmin client interface provides us to enter 5 fields in our userlogin table. So let's create all the fields.
Field1:
Name: id , Type: int, Length/Values:10, Index: PRIMARY, A_I: selected
Field2:
Name: username., Type: VARCHAR, Length/Values: 20
Field3:
Name: email, Type: VARCHAR, Length/Values: 50
Field4:
Name: password, Type: VARCHAR, Length/Value: 50
Field5:
Name: created_at, Type: TIMESTAMP, Default: CURRENT_TIMESTAMP
Click the Save button.
Our First table userlogin for database myFirstDatabase created successfully. let's enter two rows into it. Click userlogin table.
Click Insert
Type the field values shown as below and click the Go button to insert both records
Here is our list of records we have entered in our userlogin table inside our database myFirstDatabase.
So far, we have configured our MySql Database and added two records in it. Let's move on to Part-3 of this tutorial where we will see how we can connect our database from PHP application and fetch data!
Read Part-1 of this tutorial


0 comments:
Post a Comment