Let's install Laravel
Laravel offers various ways to install in windows or mac. Best and easiest way to install Laravel is through Composer. Composer is dependency manager for PHP which you can install on your web server.
Click here to install Composer, install composer globally to use composer from anywhere in your pc.
C:\>composer
Now we are ready for Laravel Installation. Create a folder in c:\ > and and install laravel in it. Use Enter key after each command given below. Make sure your computer is connected to internet.
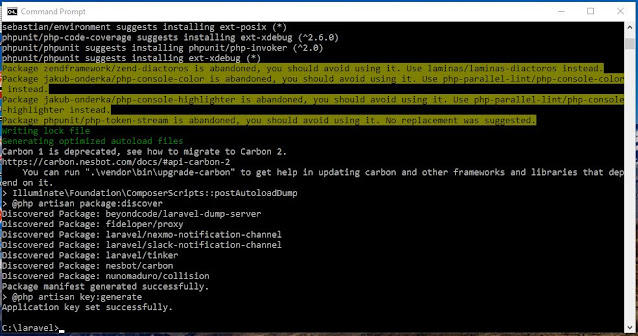
C:\Users\Amarjit Gogoi>cd\C:\>md laravelC:\>cd laravelc:\laravel>composer create-project laravel/laravel otpApplication --prefer-dist v5.7
If you see this text, means, you have installed laravel successfully.
Now let's test our brand new laravel application.To test our laravel application which is installed inside otpApplication folder type the following command in your command prompt
C:\>laravel>cd otpApplication
C:\>laravel\otpApplication>php artisan serveAfter executing the above command, you will see a screen as shown below
Copy the URL in red box in the above screenshot and open that URL in the browser. If you see the following screen, it implies Laravel has been installed successfully.
Now close the command prompt and let's start coding our otpApplication. To edit code we are using Visual Studio Code Editor. You can download Visual Studio Code from here. Open VSCode and explore our otpApplication from c:\laravel folder. Now let's open the app.php file which is inside config folder and add the following codes in line number 4 ( after return [ ). These values used here are from Firebase application configuration value. To get the value again login to your Firebase Account, click LaravelOTP app.
Now click the LaravelOTP web app shown inside the red rectangle.
Now click the setting gear shown inside the red rectangle.
Here is your Key values under general tab. Scroll down if you are unable to see.
Now we are using these values inside our laravel application. Switch over to VSCode editor. Add these Firebase Key values here in app.php file which is inside config folder and add the following codes in line number 4 ( after return [ ).
'firebase_api_key' => env('FB_API_KEY','AIzaSyAvOVUmXf7MRAby9DLEqnr06ocUomuHVwY'),
'firebase_auth_domain' => env('FB_AUTH_DOMAIN','laravelotp-bb918.firebaseapp.com'),
'firebase_database_url' => env('FB_DATABASE_URL','https://laravelotp-bb918.firebaseio.com'),
'firebase_project_id' => env('FB_PROJECT_ID','laravelotp-bb918'),
'firebase_storage_bucket' => env('FB_STORAGE_BUCKET','laravelotp-bb918.appspot.com'),
'firebase_messaging_sender_id' => env('FB_MESSAGING_SENDER_ID','929664218611'),
'firebase_app_id' => env('FB_APP_ID','1:929664218611:web:a7f646e1e4c68d23688e86'),
'firebase_measurement_id' => env('FB_MEASUREMENT_ID','G-E77F0YSJFN'),
In VSCode it looks like this. Pl. note that your Firebase keys will be different from mine. So type it accordingly. Save the file using shortcut key Ctrl+S or from the File Menu.
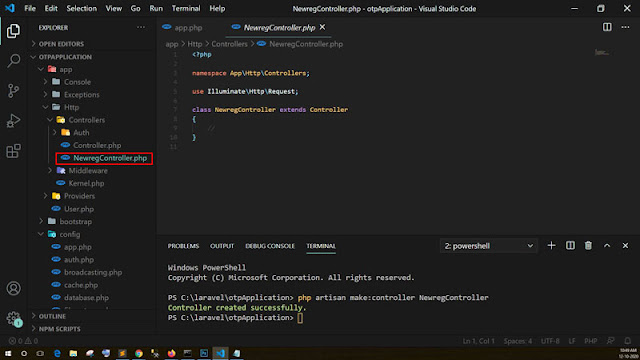
Now we are going to create a new controller. To create a controller open the command prompt. make sure that you are inside c:\laravel\otpApplication folder. From VsCode Terminal it is more simple. lets use VsCode terminal. In VsCode click Terminal menu then select NewTerminal. and use the following command to create a new controller.
php artisan make:controller NewregController
On pressing enter key, a new controller will be created inside app/Controller Folder. Double click the file NewregController.php so that we can modify according to our requirement.
Let's move on to Part-3 of this tutorial


0 comments:
Post a Comment