In this tutorial we will setup Apache, PHP and MySql Server in our local computer and create our very first Web site using Joomla Content Management System. Joomla is a free and open-source content management system for publishing web content. Joomla can be used to build any kind of website from Blog, Corporate Website to E-Commerce site. To install Joomla in our local machine, there are few requirements. First, you must have a web server either Apache, Nginx or Microsoft IIS installed on your local machine. Database supported by Joomla are MySql, SQL Server or PostgreSQL. Any one Database Server must be installed in your local machine before Joomla Installation. Joomla is developed using PHP, the recommended PHP version is 7.3+. There are many software that you can install separately for these! However, there are some difficulties for beginners to install individually and combine them to install before Joomla installation.
WAMP stands for "Windows, Apache, MySQL, and PHP". WAMP is a variation of LAMP for Windows systems and is often installed as a software bundle (Apache, MySQL, and PHP). It is often used for web development and internal testing, but may also be used to serve live websites. The most important part of the WAMP package is Apache (or "Apache HTTP Server") which is used run the web server within Windows. By running a local Apache web server on a Windows machine, a web developer can test webpages in a web browser without publishing them live on the Internet.
For this Joomla Website Project we will use WampServer first. To install WampServer, download WampServer software from here and double click the downloaded file to begin installation. Just follow the instructions from the installer and you'll be done installing WampServer within a few clicks. Do not install WampServer along with Windows OS Drive. Select another drive to install WampServer. For WampServer installation and setup please read this post
Assume that our Wamp installation folder is D:/wamp64. After successful installation run your Wamp application and Wamp will start Apache, PHP and MySql server for you and you are good to go. If you see this screen in this address http://localhost , you are ready for Joomla installation.
Let's download Joomla from here. Current Joomla Stable version is while writing the post is 3.9.22.
Inside our Wamp installation folder there is a sub folder named www . Select this sub folder and create another subfolder named myjoomlasite.com
Copy the downloaded compressed file and extract inside sub folder myjoomlasite.com. Below is the file and folder structure after extract the downloaded file.
Joomla stores all data in database. Every installation of the Joomla CMS requires a database. The database will store data such as articles, menus, categories, and users. This information is needed to make and manage a Joomla website. To create a database for our website myjoomlasite.com, let's create a database.
Open your web browser and type http://localhost/phpmyadmin, this will start PhpMyAdmin client software to connect and create MySQL database and MySQL database user for our project.
Type root in Username textbox, select MySQL in Server Choice dropdown and click Go button.
Click Database tab, type myjoomla_db, click Create button to create the database for out project.
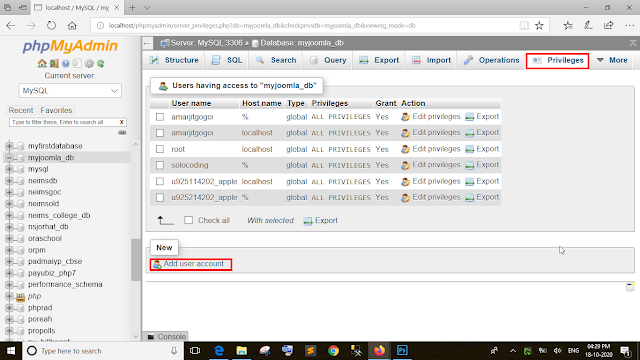
Now our database myjoomla_db is selected. Click Privileges tab and select Add user account to create user for this database.
Click User account tab, type myjoomlauser and mypassword in User name and Password textbox. Check the Grant all privileges on database myjoomla_db checkbox. Also check Data, Structure and Administration checkbox if not automatically selected, and click Go button.
Now close your web browser and reopen and type http://localhost/phpmyadmin in address bar. Type myjoomlauser and mypassword in Username and Password textbox of PhpMyAdmin login screen. If you successfully logged in, you can continue to Joomla installation step. Repeat the above step if you unable to log in to PhpMyAdmin Client by typing root in Username without a password.
So far, we have completed two major steps. We also extracted downloaded zip file inside sub folder myjoomlasite.com . Now it's time to install Joomla. Let's type http://localhost/myjoomlasite.com. If you see any error like this site can't be reached or something like this, check Wamp icon in notification area. If it is not there, run WampManager by double clicking Wamp64 icon in desktop or from the from Left Pane of windows Startup Menu. If the Wamp icon is red single click the icon and select 'Restart All Services'. If the icon is green you are ready for Joomla installation in your localhost.
Now open your web browser and type http://localhost/myjoomlasite in address bar hit enter, Hurray! Joomla is ready to set up your website.
Type My Joomla Site, in Sitename, This is my first website using Joomla CMS in Description, your Email ID in Email, jadmin in Username, jpassword in Password and Confirm Password and click Next button.
This information below is database configuration part. in this form we will provide our MySQL Database we have already created in PhpMyAdmin Client. Let's do this.
Our database type will be MySQLi, so select Database type as MySQLi. Hostname will be localhost. Type myjoomlauser in username and mypassword in password textbox. Type myjoomla_db in Database Name textbox. Click Next.
In this screen some PHP releted recommended settings will be shown. If your PHP settings are different then required by Joomla it will show the recommendations. To modify PHP settings single click Wamp icon in notification area and set it accordingly. Please note that any changes in settings/configuration, inside Wamp, require Restart all services.
Click Install. On successful installation, click Remove "Installation" folder button and then click Site button.
Here is our fresh Joomla website and is ready to rock!
In next part, we will modify our Joomla website to a very attractive one by installing Template, Components, Modules and some plugins. Stay tuned!


0 comments:
Post a Comment